GarmentIQ - Documentation
Welcome to the official documentation of GarmentIQ! This guide is designed to help you get the most out of the powerful tools and features offered by GarmentIQ. Our platform provides two primary components for building and running AI-driven solutions for the garment industry: GarmentIQ MagicBox and GarmentIQ Python API.
This documentation will guide you through the setup, usage, and best practices for both GarmentIQ MagicBox and the GarmentIQ Python API, enabling you to efficiently develop and deploy your garment industry solutions.
GarmentIQ MagicBox
A powerful, synchronized environment for running code and experiments seamlessly. MagicBox includes pre-configured dependencies and a user-friendly interface for running notebooks and scripts.
Read the documentationGarmentIQ Python API
A comprehensive set of Python libraries for integrating GarmentIQ into your own applications. The API allows you to leverage GarmentIQ's advanced algorithms and data processing capabilities in a flexible, programmatic way.
Read the API reference (Open in a new window)Overview of GarmentIQ Python Package
The garmentiq package provides an automated solution for garment measurement from images, utilizing computer vision techniques for classification, segmentation, and landmark extraction.
-
tailor: This module acts as the central agent for the entire pipeline, orchestrating the different stages of garment measurement from classification to landmark derivation. It integrates the functionalities of other modules to provide a smooth end-to-end process. -
classification: This module is responsible for identifying the type of garment in an image. Its key functions include:fine_tune_pytorch_nn,load_data,load_model,predict,test_pytorch_nn,train_pytorch_nn, andtrain_test_split -
segmentation: This module focuses on isolating garment features from the background for improved measurement accuracy. Its key functions include:change_background_color,extract,load_model, andprocess_and_save_images. -
landmark: This module handles the detection, derivation, and refinement of key points on garments. Its key functions include:derive,detect, andrefine. -
Instruction Schemas: The
instruction/folder contains 9 predefined measurement schemas in.jsonformat, which are utilized by thegarment_classes.pyfilegarment_classesdictionary to define different garment types and their predefined measurement properties. Users can also define their own custom measurement instructions by creating new dictionaries formatted similarly to the existing garment classes.
Quick Start
This section provides simple examples demonstrating how to use the garmentiq Python API, offering users an overview of how the entire pipeline - as well as each individual step - works.
⚠️ Note: If you encounter errors while running the following examples in Colab, they are likely due to Python package version conflicts specific to the Colab environment. We recommend installing MagicBox on your local machine, where you can find and run these examples under working/examples/.
Installation
Please install from PyPI using the following command.
pip install garmentiq -qTailor (the whole pipeline)
The tailor agent executes the entire pipeline in sequence: classification, segmentation (if needed), landmark detection, landmark refinement (if required), and landmark derivation (if applicable). Note that the first 3 steps can also be executed independently (the last 2 steps depend on the results returned by segmentation), without the use of the tailor agent, as described in the following subsections.
![]()
import garmentiq as giq
from garmentiq.classification.model_definition import tinyViT
from garmentiq.landmark.detection.model_definition import PoseHighResolutionNet
from garmentiq.garment_classes import garment_classes
from garmentiq.landmark.derivation.derivation_dict import derivation_dict

# Download 4 test images
# cloth_1 and cloth_2 are short sleeve tops, cloth_3 is vest dress, cloth_4 is skirt
!mkdir -p test_image
!wget -q -O /content/test_image/cloth_1.jpg \
    https://raw.githubusercontent.com/lygitdata/GarmentIQ/refs/heads/gh-pages/asset/img/cloth_1.jpg
!wget -q -O /content/test_image/cloth_2.jpg \
    https://raw.githubusercontent.com/lygitdata/GarmentIQ/refs/heads/gh-pages/asset/img/cloth_2.jpg
!wget -q -O /content/test_image/cloth_3.jpg \
    https://raw.githubusercontent.com/lygitdata/GarmentIQ/refs/heads/gh-pages/asset/img/cloth_3.jpg
!wget -q -O /content/test_image/cloth_4.jpg \
    https://raw.githubusercontent.com/lygitdata/GarmentIQ/refs/heads/gh-pages/asset/img/cloth_4.jpg

# Download the classification model
!mkdir -p models
!wget -q -O /content/models/tiny_vit_inditex_finetuned.pt \
    https://huggingface.co/lygitdata/garmentiq/resolve/main/tiny_vit_inditex_finetuned.pt

# Download the landmark detection model
!wget -q -O /content/models/hrnet.pth \
    https://huggingface.co/lygitdata/garmentiq/resolve/main/hrnet.pth

# Setup the tailor agent
tailor = giq.tailor(
    input_dir="/content/test_image",
    model_dir="/content/models",
    output_dir="/content/output",
    class_dict=garment_classes,
    do_derive=True,
    derivation_dict=derivation_dict,
    do_refine=True,
    classification_model_path="tiny_vit_inditex_finetuned.pt",
    classification_model_class=tinyViT,
    classification_model_args={
        "num_classes": len(list(garment_classes.keys())),
        "img_size": (120, 184),
        "patch_size": 6,
        "resize_dim": (120, 184),
        "normalize_mean": [0.8047, 0.7808, 0.7769],
        "normalize_std": [0.2957, 0.3077, 0.3081],
    },
    segmentation_model_name="lygitdata/BiRefNet_garmentiq_backup",
    segmentation_model_args={
        "trust_remote_code": True,
        "resize_dim": (1024, 1024),
        "normalize_mean": [0.485, 0.456, 0.406],
        "normalize_std": [0.229, 0.224, 0.225],
        "high_precision": True,
        "background_color": [102, 255, 102],
    },
    landmark_detection_model_path="hrnet.pth",
    landmark_detection_model_class=PoseHighResolutionNet(),
    landmark_detection_model_args={
        "scale_std": 200.0,
        "resize_dim": [288, 384],
        "normalize_mean": [0.485, 0.456, 0.406],
        "normalize_std": [0.229, 0.224, 0.225],
    },
)

# See the tailor agent's basic information
tailor.summary()

# Start the measurement with refinement and derivation
metadata, outputs = tailor.measure(save_segmentation_image=True, save_measurement_image=True)

# See the metadata
# It makes file access much easier
print(metadata)

# Plot the masks
# Go to /content/output/mask_image/ to see the high resolution images
for image in metadata['mask_image']:
  giq.landmark.plot(image_path=image, figsize=(3, 3))

# Plot the background modified images
# Go to /content/output/bg_modified_image to see the high resolution images
for image in metadata['bg_modified_image']:
  giq.landmark.plot(image_path=image, figsize=(3, 3))

# Plot the images with desired landmarks
# Go to /content/output/measurement_image/ to see the high resolution images
for image in metadata['measurement_image']:
  giq.landmark.plot(image_path=image, figsize=(3, 3))

# See the measurement results in JSON format
# Go to /content/output/measurement_json/ to see the JSON files
import json

for json_path in metadata['measurement_json']:
    with open(json_path, 'r') as file:
        data = json.load(file)
        print(f"{json_path}:\n")
        print(json.dumps(data, indent=4, sort_keys=True))
        print("\n\n")
Classification
![]()
import garmentiq as giq
from garmentiq.classification.model_definition import tinyViT
from garmentiq.classification.utils import CachedDataset

# Download test data and a pretrained model
!mkdir -p models

!curl -L -o /content/garmentiq-classification-set-nordstrom-and-myntra.zip \
  https://www.kaggle.com/api/v1/datasets/download/lygitdata/garmentiq-classification-set-nordstrom-and-myntra

!wget -q -O /content/models/tiny_vit_inditex_finetuned.pt \
    https://huggingface.co/lygitdata/garmentiq/resolve/main/tiny_vit_inditex_finetuned.pt

# Prepare test data
DATA = giq.classification.train_test_split(
    output_dir="data",
    metadata_csv="metadata.csv",
    label_column="garment",
    train_zip_dir="garmentiq-classification-set-nordstrom-and-myntra.zip",
    test_size=0.15,
    verbose=True
)

test_images, test_labels, _ = giq.classification.load_data(
    df=DATA["test_metadata"],
    img_dir=DATA["test_images"],
    label_column="garment",
    resize_dim=(120, 184),
    normalize_mean=[0.8047, 0.7808, 0.7769],
    normalize_std=[0.2957, 0.3077, 0.3081]
)

# Load the pretrained model
classifier = giq.classification.load_model(
    model_path="/content/models/tiny_vit_inditex_finetuned.pt",
    model_class=tinyViT,
    model_args={"num_classes": 9, "img_size": (120, 184), "patch_size": 6}
)

# Fit the model on the whole test data
giq.classification.test_pytorch_nn(
    model_path="/content/models/tiny_vit_inditex_finetuned.pt",
    model_class=tinyViT,
    model_args={"num_classes": 9, "img_size": (120, 184), "patch_size": 6},
    dataset_class=CachedDataset,
    dataset_args={
        "raw_labels": DATA["test_metadata"]["garment"],
        "cached_images": test_images,
        "cached_labels": test_labels,
    },
    param={"batch_size": 64},
)

# Fit the model on a single image
img_to_test = DATA['test_metadata']['filename'][88]

pred_label, pred_prob = giq.classification.predict(
    model=classifier,
    image_path=f"data/test/images/{img_to_test}",
    classes=DATA['test_metadata']['garment'].unique().tolist(),
    resize_dim=(120, 184),
    normalize_mean=[0.8047, 0.7808, 0.7769],
    normalize_std=[0.2957, 0.3077, 0.3081]
)

print(
    "True label: ", img_to_test,
    "\nPredicted label: ", pred_label,
    "\nPredicted Probabilities: ", pred_prob
)
Segmentation
![]()
import garmentiq as giq

# Download a test image
!mkdir -p test_image
!wget -q -O /content/test_image/cloth_1.jpg \
    https://raw.githubusercontent.com/lygitdata/GarmentIQ/refs/heads/gh-pages/asset/img/cloth_1.jpg

# Load the pretrained model from Hugging Face
BiRefNet = giq.segmentation.load_model(
    pretrained_model='lygitdata/BiRefNet_garmentiq_backup',
    pretrained_model_args={'trust_remote_code': True},
    high_precision=True
)

# Extract the mask
original_img, mask = giq.segmentation.extract(
    model=BiRefNet,
    image_path='/content/test_image/cloth_1.jpg',
    resize_dim=(1024, 1024),
    normalize_mean=[0.485, 0.456, 0.406],
    normalize_std=[0.229, 0.224, 0.225],
    high_precision=True
)

# Change background color
bg_modified_img = giq.segmentation.change_background_color(
    image_np=original_img,
    mask_np=mask,
    background_color=[102, 255, 102]
)

# Plot the original image, mask, and background modified image
giq.segmentation.plot(image_np=original_img, figsize=(3, 3))
giq.segmentation.plot(image_np=mask, figsize=(3, 3))
giq.segmentation.plot(image_np=bg_modified_img, figsize=(3, 3))
Landmark detection
![]()
import garmentiq as giq
from garmentiq.landmark.detection.model_definition import PoseHighResolutionNet
from garmentiq.garment_classes import garment_classes
# Download a vest dress image and a pretrained model
!mkdir -p test_image
!wget -q -O /content/test_image/cloth_3.jpg \
https://raw.githubusercontent.com/lygitdata/GarmentIQ/refs/heads/gh-pages/asset/img/cloth_3.jpg
!mkdir -p models
!wget -q -O /content/models/hrnet.pth \
https://huggingface.co/lygitdata/garmentiq/resolve/main/hrnet.pth
# Plot the image
giq.landmark.plot(image_path="/content/test_image/cloth_3.jpg", figsize=(3, 3))
# Load the pretrained model from Hugging Face
HRNet = giq.landmark.detection.load_model(
model_path="/content/models/hrnet.pth",
model_class=PoseHighResolutionNet()
)
# Detect predefined landmarks
coords, maxvals, detection_dict = giq.landmark.detect(
class_name="vest dress",
class_dict=garment_classes,
image_path="/content/test_image/cloth_3.jpg",
model=HRNet,
scale_std=200.0,
resize_dim=[288, 384],
normalize_mean=[0.485, 0.456, 0.406],
normalize_std=[0.229, 0.224, 0.225]
)
# Plot the detected coordinates
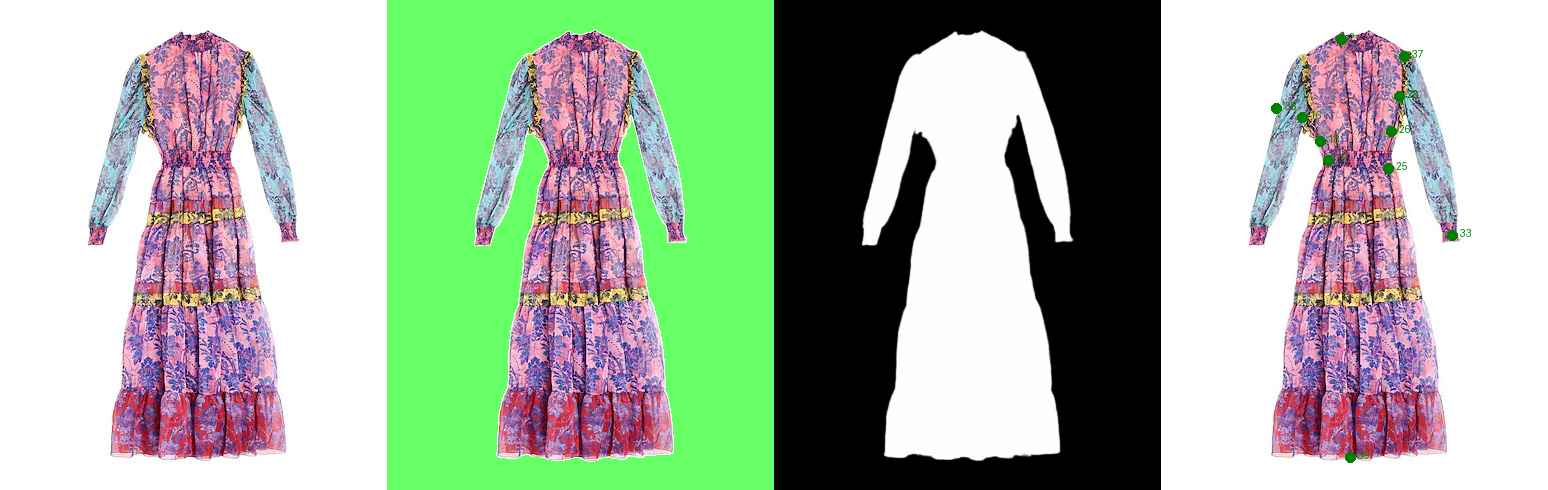
giq.landmark.plot(image_path="/content/test_image/cloth_3.jpg", coordinate=coords, figsize=(3, 3), color="green")Landmark refinement and derivation
Note that segmentation mask is required for landmark refinement and derivation and they are also based on the landmark detection results. As a result, before refining and deriving landmarks, we first need to segment the image and detect predefined landmarks.
![]()
import garmentiq as giq
from garmentiq.landmark.detection.model_definition import PoseHighResolutionNet
from garmentiq.garment_classes import garment_classes

# Download a vest dress image and a pretrained model
!mkdir -p test_image
!wget -q -O /content/test_image/cloth_3.jpg \
    https://raw.githubusercontent.com/lygitdata/GarmentIQ/refs/heads/gh-pages/asset/img/cloth_3.jpg

!mkdir -p models
!wget -q -O /content/models/hrnet.pth \
    https://huggingface.co/lygitdata/garmentiq/resolve/main/hrnet.pth

# Plot the image
giq.landmark.plot(image_path="/content/test_image/cloth_3.jpg", figsize=(3, 3))

# Load the pretrained model from Hugging Face
HRNet = giq.landmark.detection.load_model(
    model_path="/content/models/hrnet.pth",
    model_class=PoseHighResolutionNet()
)

# Detect predefined landmarks
coords, maxvals, detection_dict = giq.landmark.detect(
    class_name="vest dress",
    class_dict=garment_classes,
    image_path="/content/test_image/cloth_3.jpg",
    model=HRNet,
    scale_std=200.0,
    resize_dim=[288, 384],
    normalize_mean=[0.485, 0.456, 0.406],
    normalize_std=[0.229, 0.224, 0.225]
)

# Plot the detected coordinates
giq.landmark.plot(image_path="/content/test_image/cloth_3.jpg", coordinate=coords, figsize=(3, 3), color="green")

# Segmentation mask is required for refinement and derivation
# So we need to do segmentation first
BiRefNet = giq.segmentation.load_model(
    pretrained_model='lygitdata/BiRefNet_garmentiq_backup',
    pretrained_model_args={'trust_remote_code': True},
    high_precision=True
)
original_img, mask = giq.segmentation.extract(
    model=BiRefNet,
    image_path='/content/test_image/cloth_3.jpg',
    resize_dim=(1024, 1024),
    normalize_mean=[0.485, 0.456, 0.406],
    normalize_std=[0.229, 0.224, 0.225],
    high_precision=True
)

# Refine the landmarks
refined_coords, refined_detection_dict = giq.landmark.refine(
    class_name="vest dress",
    detection_np=coords,
    detection_conf=maxvals,
    detection_dict=detection_dict,
    mask=mask,
    window_size=5,
    ksize=(11, 11),
    sigmaX=0.0
)
# Print the original coordinates and the refined coordinates
print("Original coordinates:\n", coords)
print("Refined coordinates:\n", refined_coords)

# Derive custom landmarks
derived_coords, derived_detection_dict = giq.landmark.derive(
    class_name="vest dress",
    detection_dict=refined_detection_dict,
    derivation_dict=giq.landmark.derivation_dict.derivation_dict,
    landmark_coords=refined_coords,
    np_mask=mask
)

import numpy as np

# Plot the derived point
giq.landmark.plot(
    image_path="/content/test_image/cloth_3.jpg",
    coordinate=np.concatenate((refined_coords, np.array([[derived_coords['20']]])), axis=1),
    figsize=(3, 3),
    color="green"
)
Advanced Usage
⚠️ Note: If you encounter errors while running the following examples in Colab, they are likely due to Python package version conflicts specific to the Colab environment. We recommend installing MagicBox on your local machine, where you can find and run these examples under working/examples/.
Custom measurement instruction
![]()
import json
import copy


# See our predefined garments and measurement instructions
#
# - `num_predefeined_points` and `index_range` are determined by training data -
# DeepFashion2, change them if it is indeed necessary.
#
# - `instruction` is the path to a .json file, GarmentIQ has predefined
# instructions.
#
# Generate or see predefined instructions at:
# https://garmentiq.ly.gd.edu.kg/application/demo/instruction-generation/
from garmentiq.garment_classes import garment_classes
print(json.dumps(garment_classes, indent=4))


# Let us change the measurement instruction of skirt
# See the predefined instruction
# There are `waist`, `full length`, and `hips` as measurements in GarmentIQ's
# default measurement instruction of a skirt. What if we only want `waist` and
# `hips`? Simply create one! Recommend to use GarmentIQ instruction generation
# tool to generate the instruciton:
# https://garmentiq.ly.gd.edu.kg/application/demo/instruction-generation/
with open(garment_classes['skirt']['instruction'], 'r') as file:
    data = json.load(file)
print(json.dumps(data, indent=4))


# Let us create a simple instruction in python here and convert it to json
skirt_new = {
    "skirt": {
        "landmarks": {
            "1": {
                "predefined": True,
                "description": "waist_left",
                "x": 60,
                "y": 40
            },
            "3": {
                "predefined": True,
                "description": "waist_right",
                "x": 140,
                "y": 40
            },
            "4": {
                "predefined": True,
                "description": "side_seam_left",
                "x": 50,
                "y": 80
            },
            "8": {
                "predefined": True,
                "description": "side_seam_right",
                "x": 150,
                "y": 80
            }
        },
        "measurements": {
            "waist": {
                "landmarks": {
                    "start": "1",
                    "end": "3"
                },
                "description": "/"
            },
            "hips": {
                "landmarks": {
                    "start": "4",
                    "end": "8"
                },
                "description": "/"
            }
        }
    }
}

# Save it to a JSON file with indentation
with open('skirt_new.json', 'w') as file:
    json.dump(skirt_new, file, indent=4)


# Create a new garment class metadata dictionary
new_garment_classes = copy.deepcopy(garment_classes)
new_garment_classes['skirt']['instruction'] = 'skirt_new.json'
print(new_garment_classes['skirt'])


# Okay now we have the new instruction, let us try the detection model to see
# the difference
# Import necessary modules
import garmentiq as giq
from garmentiq.landmark.detection.model_definition import PoseHighResolutionNet

# Download a skirt image and a pretrained model
!mkdir -p test_image
!wget -q -O /content/test_image/cloth_4.jpg \
    https://raw.githubusercontent.com/lygitdata/GarmentIQ/refs/heads/gh-pages/asset/img/cloth_4.jpg

!mkdir -p models
!wget -q -O /content/models/hrnet.pth \
    https://huggingface.co/lygitdata/garmentiq/resolve/main/hrnet.pth


# Plot the image
giq.landmark.plot(image_path="/content/test_image/cloth_4.jpg", figsize=(3, 3))


# Load the pretrained model from Hugging Face
HRNet = giq.landmark.detection.load_model(
    model_path="/content/models/hrnet.pth",
    model_class=PoseHighResolutionNet()
)


# Detect landmarks (DEFAULT instruction)
_, _, detection_dict = giq.landmark.detect(
    class_name="skirt",
    class_dict=garment_classes,
    image_path="/content/test_image/cloth_4.jpg",
    model=HRNet,
    scale_std=200.0,
    resize_dim=[288, 384],
    normalize_mean=[0.485, 0.456, 0.406],
    normalize_std=[0.229, 0.224, 0.225]
)

# Clean the detection dictionary
# See that we have all the three measurements
detection_dict_cleaned = giq.utils.clean_detection_dict(
    class_name='skirt',
    image_name='cloth_4.jpg',
    detection_dict=detection_dict
)
detection_dict_cleaned


# Detect landmarks (NEW instruction)
# Note that we use `class_dict=new_garment_classes` here
_, _, detection_dict_new = giq.landmark.detect(
    class_name="skirt",
    class_dict=new_garment_classes,
    image_path="/content/test_image/cloth_4.jpg",
    model=HRNet,
    scale_std=200.0,
    resize_dim=[288, 384],
    normalize_mean=[0.485, 0.456, 0.406],
    normalize_std=[0.229, 0.224, 0.225]
)

# Clean the detection dictionary
# See that we only have two measurements we want
detection_dict_new_cleaned = giq.utils.clean_detection_dict(
    class_name='skirt',
    image_name='cloth_4.jpg',
    detection_dict=detection_dict_new
)
detection_dict_new_cleaned
Classification model training & evaluation
![]()
import garmentiq as giq
from garmentiq.classification.model_definition import CNN3
from garmentiq.classification.utils import CachedDataset
import torch.optim as optim
import torch.nn as nn


# Download training data
# To train a model using GarmentIQ framework, your data must be in a zip file
# and the zip file should have the same structure as our data. See the link:
# https://www.kaggle.com/datasets/lygitdata/garmentiq-classification-set-nordstrom-and-myntra
!curl -L -o garmentiq-classification-set-nordstrom-and-myntra.zip \
  https://www.kaggle.com/api/v1/datasets/download/lygitdata/garmentiq-classification-set-nordstrom-and-myntra


# Split the data into training set and testing set
data = giq.classification.train_test_split(
    output_dir="data",
    train_zip_dir="garmentiq-classification-set-nordstrom-and-myntra.zip",
    metadata_csv="metadata.csv",
    label_column="garment",
    test_size=0.15,
    verbose=True
)


# Load the training set into memory for faster I/O during training
train_images, train_labels, _ = giq.classification.load_data(
    df=data["train_metadata"],
    img_dir=data["train_images"],
    label_column="garment",
    resize_dim=(60, 92),
    normalize_mean=[0.8047, 0.7808, 0.7769],
    normalize_std=[0.2957, 0.3077, 0.3081]
)


# Train with GarmentIQ predefined model - CNN3
# Note that we use `model_class=CNN3` here
# For demonstration purpose, we only use 2 folds and 5 epochs
# Models are saved at the folder `cnn3_models`
# It automatically selects the model with the lowest cross entropy
# as the best model
giq.classification.train_pytorch_nn(
    model_class=CNN3,
    model_args={"num_classes": 9},
    dataset_class=CachedDataset,
    dataset_args={
        "metadata_df": data["train_metadata"],
        "raw_labels": data["train_metadata"]["garment"],
        "cached_images": train_images,
        "cached_labels": train_labels,
    },
    param={
        "optimizer_class": optim.AdamW,
        "optimizer_args": {"lr": 0.001, "weight_decay": 1e-4},
        "n_fold": 2,
        "n_epoch": 5,
        "patience": 2,
        "batch_size": 256,
        "model_save_dir": "cnn3_models",
        "best_model_name": "best_cnn3_model.pt",
    },
)


# Train with a user-defined model
class UserDefinedCNN(nn.Module):
    def __init__(self, num_classes):
        super(UserDefinedCNN, self).__init__()
        self.features = nn.Sequential(
            nn.Conv2d(3, 32, kernel_size=3, padding=1),
            nn.BatchNorm2d(32),
            nn.ReLU(inplace=True),
            nn.MaxPool2d(2, 2),
            nn.Dropout(0.2),
            nn.Conv2d(32, 64, kernel_size=3, padding=1),
            nn.BatchNorm2d(64),
            nn.ReLU(inplace=True),
            nn.MaxPool2d(2, 2),
            nn.Dropout(0.25),
            nn.AdaptiveAvgPool2d((4, 4)),
        )
        self.classifier = nn.Sequential(
            nn.Linear(64 * 4 * 4, 128),
            nn.ReLU(inplace=True),
            nn.Dropout(0.3),
            nn.Linear(128, num_classes),
        )
    def forward(self, x):
        x = self.features(x)
        x = x.view(x.size(0), -1)
        x = self.classifier(x)
        return x

# For demonstration purpose, we only use 2 folds and 5 epochs
# Models are saved at the folder `cnn1_models`
# It automatically selects the model with the lowest cross entropy
# as the best model
giq.classification.train_pytorch_nn(
    model_class=UserDefinedCNN,
    model_args={"num_classes": 9},
    dataset_class=CachedDataset,
    dataset_args={
        "metadata_df": data["train_metadata"],
        "raw_labels": data["train_metadata"]["garment"],
        "cached_images": train_images,
        "cached_labels": train_labels,
    },
    param={
        "optimizer_class": optim.AdamW,
        "optimizer_args": {"lr": 0.001, "weight_decay": 1e-4},
        "n_fold": 2,
        "n_epoch": 5,
        "patience": 2,
        "batch_size": 256,
        "model_save_dir": "userdefined_cnn_models",
        "best_model_name": "best_userdefined_cnn_model.pt",
    },
)


# Load the testing set for model evaluation
test_images, test_labels, _ = giq.classification.load_data(
    df=data["test_metadata"],
    img_dir=data["test_images"],
    label_column="garment",
    resize_dim=(60, 92),
    normalize_mean=[0.8047, 0.7808, 0.7769],
    normalize_std=[0.2957, 0.3077, 0.3081]
)


# Evaluate CNN3 model on the testing set
giq.classification.test_pytorch_nn(
    model_path="cnn3_models/best_cnn3_model.pt",
    model_class=CNN3,
    model_args={"num_classes": 9},
    dataset_class=CachedDataset,
    dataset_args={
        "raw_labels": data["test_metadata"]["garment"],
        "cached_images": test_images,
        "cached_labels": test_labels,
    },
    param={"batch_size": 64},
)


# Evaluate user-defined model on the testing set
# We can see that the CNN3 model performs better on the test set
# than this user-defined CNN model
giq.classification.test_pytorch_nn(
    model_path="userdefined_cnn_models/best_userdefined_cnn_model.pt",
    model_class=UserDefinedCNN,
    model_args={"num_classes": 9},
    dataset_class=CachedDataset,
    dataset_args={
        "raw_labels": data["test_metadata"]["garment"],
        "cached_images": test_images,
        "cached_labels": test_labels,
    },
    param={"batch_size": 64},
)
Classification model fine-tuning
![]()
import garmentiq as giq
from garmentiq.classification.model_definition import tinyViT
from garmentiq.classification.utils import CachedDataset
import torch.optim as optim


# Download fine-tuning data
# To train a model using GarmentIQ framework, your data must be in a zip file
# and the zip file should have the same structure as our data. See the link:
# https://www.kaggle.com/datasets/lygitdata/zara-clothes-image-data
!curl -L -o /content/zara-clothes-image-data.zip\
  https://www.kaggle.com/api/v1/datasets/download/lygitdata/zara-clothes-image-data

# Download the base model - tinyViT - to be finetuned
!mkdir -p models
!wget -q -O /content/models/tiny_vit.pt \
    https://huggingface.co/lygitdata/garmentiq/resolve/main/tiny_vit.pt


# Prepare the data for fine-tuning
# As our data size is small, we make the testing set to be 0%
# You can see from the test set summary that the size is 0
data = giq.classification.train_test_split(
    output_dir="data",
    train_zip_dir="zara-clothes-image-data.zip",
    metadata_csv="metadata.csv",
    label_column="garment",
    test_size=0,
    verbose=True
)


# Load the training set into memory for faster I/O during training
train_images, train_labels, _ = giq.classification.load_data(
    df=data["train_metadata"],
    img_dir=data["train_images"],
    label_column="garment",
    resize_dim=(120, 184),
    normalize_mean=[0.8047, 0.7808, 0.7769],
    normalize_std=[0.2957, 0.3077, 0.3081]
)


# Fine-tune the pretrained tinyViT model
# For demonstration purpose, we only use 5 folds and 5 epochs
# Models are saved at the folder `finetuned_models`
# It automatically selects the model with the lowest cross entropy
# as the best model
giq.classification.fine_tune_pytorch_nn(
    model_class=tinyViT,
    model_args={"num_classes": 9, "img_size": (120, 184), "patch_size": 6},
    dataset_class=CachedDataset,
    dataset_args={
        "metadata_df": data["train_metadata"],
        "raw_labels": data["train_metadata"]["garment"],
        "cached_images": train_images,
        "cached_labels": train_labels,
    },
    param={
        "pretrained_path": "/content/models/tiny_vit.pt",
        "freeze_layers": True,
        "unfreeze_patterns": ["classifier", "fc"],
        "optimizer_class": optim.AdamW,
        "optimizer_args": {"lr": 0.00002, "weight_decay": 1e-4},
        "n_fold": 5,
        "n_epoch": 5,
        "patience": 2,
        "batch_size": 128,
        "model_save_dir": "finetuned_models",
        "best_model_name": "best_finetuned.pt"
    },
)


# See the performance of the finetuned model on the fine-tuning dataset
giq.classification.test_pytorch_nn(
    model_path="/content/finetuned_models/best_finetuned.pt",
    model_class=tinyViT,
    model_args={"num_classes": 9, "img_size": (120, 184), "patch_size": 6},
    dataset_class=CachedDataset,
    dataset_args={
        "raw_labels": data["train_metadata"]["garment"],
        "cached_images": train_images,
        "cached_labels": train_labels,
    },
    param={"batch_size": 64},
)